Marmalade.fm 🍊

marmalade

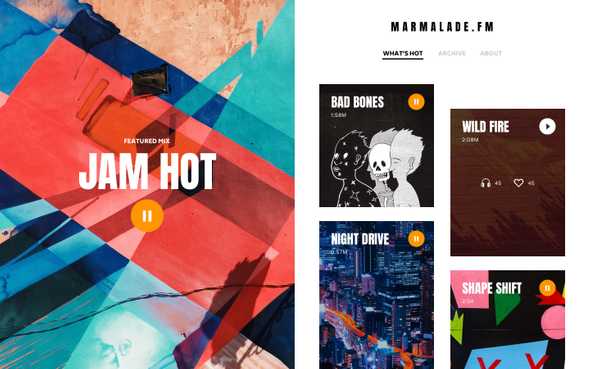
For our third week project we’re going to be building a React app called Marmalade.fm, a site that showcases the finest grooves, beats and world music.

It uses the Mixcloud API behind the scenes to fetch our mixes as well as using the Javascript audio along with React events and state to play our music.

We’ll also be adding multiple pages into this app, using React Router to move between views whilst our music keeps on playing for a smooth user experience.

Our component structure

The rough component structure we’re going to use will be:

FeaturedMix

Header

Routed pages

AudioPlayer

components

  • FeaturedMix — our featured or currently playing mix
  • Header — header with navigation
  • Routed pages — this will change based on the page url
  • AudioPlayer — will stay at the bottom and play music

Some of these components will contain other components, but this is the main structure we’ll be going with.

Adding our styles

To add our styles we’re going to do three things.

Firstly, let’s add our custom styles into the main.css file.

Next up, we want to add our Google font imports in just above the <title></title> tags in our HTML:

<link href="https://fonts.googleapis.com/css?family=Anton|Biryani:400,900" rel="stylesheet">

Finally we want to install tachyons. We’re going to import it into our project as a package, just like we do with react and other components.

From the terminal, press CTRL + C to stop create-react-app, and then type:

yarn add tachyons

This will install the package into our node_modules folder. You can take a quick look in there but be warned, there’s quite a lot of stuff and it’s pretty daunting!

Start the server back up again with:

yarn start

Now with our tachyons package installed, we can import it into our index.js:

// inside index.js find where our main.css is imported and add it just above
import 'tachyons'
import './css/main.css'

Tachyons is now installed and ready to go!

Our first components

Let’s go ahead and add in our FeaturedMix and Header into our main App component.

class App extends Component {
  render() {
    return (
      <div>
        {/* this div contians our page (excluding audio player) */}
        <div>
          {/* FeaturedMix (needs styling and updating) */}
          <FeaturedMix />
          <div>
            {/* Header (needs styling and updating)  */}
            <Header />
            {/* Routed pages */}
          </div>
        </div>
        {/* AudioPlayer */}
      </div>
    )
  }
}

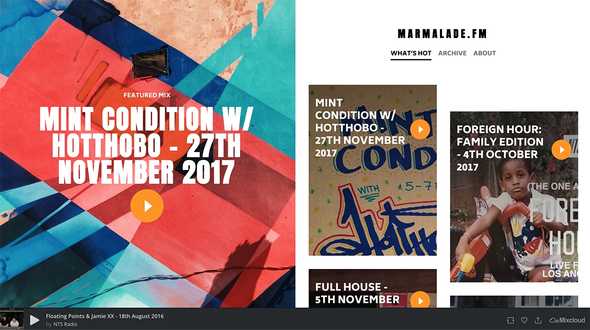
Our FeaturedMix component is going to contain our featured or currently playing mix (it’s always good to be obvious when naming components).

Let’s go ahead and create that in a components/FeaturedMix.js file:

import React, {Component} from 'react'

// we’ll code this as static data to start off with
// and then replace it later on with dynamic data
const FeaturedMix = props => (
  <div>
    <p>Featured mix</p>
    <h1>Mint Condition w/ Hotthobo - 27th November 2017</h1>
    {/* PlayButton */}
  </div>
)

// export the component so we can use it in our `App.js` file.
export default FeaturedMix

Now we can import that into our App.js file:

// at the top of the file just below our react imports
import FeaturedMix from './FeaturedMix'

Let’s do the same for our Header component inside of components/Header.js:

import React, {Component} from 'react'

const Header = props => (
  <header>
    <h1>Marmalade.fm</h1>
    <ul>
      <li>What’s hot</li>
      <li>Archive</li>
      <li>About</li>
    </ul>
  </header>
)

export default Header

We can then import our Header into App.js too:

import Header from './Header'

Our Mixcloud embed

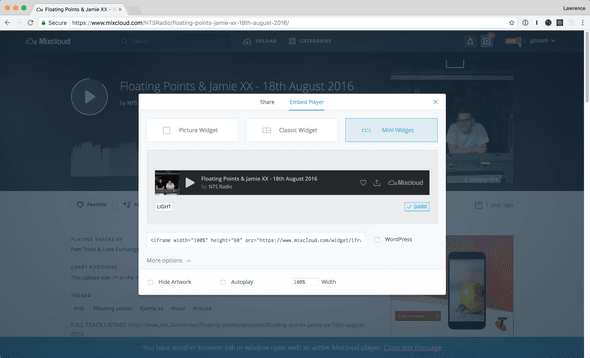
To add our Mixcloud embed, we can head to Mixcloud.com and then find something that takes your fancy. I went with a Jamie XX and Floating Points mix on NTS Radio.

From there we’ll want to go to Share and then find the dark themed Mini Widget:

mixcloud

Grabbing the embed code should give us something like this:

<iframe width="100%" height="60" src="https://www.mixcloud.com/widget/iframe/?hide_cover=1&mini=1&feed=%2FNTSRadio%2Ffloating-points-jamie-xx-18th-august-2016%2F" frameborder="0"></iframe>

In our App.js we’ll want to paste that in just before our closing div tag:

class App extends Component {
  render() {
    return (
      <div>
        {/* this div contians our page (excluding audio player) */}
        <div>
          {/* FeaturedMix (needs styling and updating) */}
          <FeaturedMix />
          <div>
            {/* Header (needs styling and updating)  */}
            <Header />
            {/* Routed pages */}
          </div>
        </div>
        {/* AudioPlayer */}
        <iframe
          width="100%"
          height="60"
          src="https://www.mixcloud.com/widget/iframe/?hide_cover=1&mini=1&feed=%2FNTSRadio%2Ffloating-points-jamie-xx-18th-august-2016%2F"
          frameBorder="0"
        />
      </div>
    )
  }
}

See how frameborder is now frameBorder? This is the way we have to type attributes with multiple words in Javascript. It’s called camelcasing, a bit like how Apple name their products. The first word starts lowercase and every other word starts with a capital:

classname → className
frameborder → frameBorder
stroke-width → strokeWidth
background-color → backgroundColor

Styling with tachyons

To style our components in this app we’re going to use tachyons. So rather than writing lots of HTML we will build our styles using a combinating of class names instead.

Let’s start with our App component:

class App extends Component {
  render() {
    return (
      <div>
        {/* this div contians our page (excluding audio player) */}
        <div className="flex-l justify-end">
          {/* FeaturedMix (needs styling and updating) */}
          <FeaturedMix />
          <div className="w-50-l relative z-1">
            {/* Header (needs styling and updating)  */}
            <Header />
            {/* Routed page */}
          </div>
        </div>
        {/* AudioPlayer */}
        <iframe
          width="100%"
          height="60"
          src="https://www.mixcloud.com/widget/iframe/?hide_cover=1&mini=1&feed=%2FNTSRadio%2Ffloating-points-jamie-xx-18th-august-2016%2F"
          frameBorder="0"
          className="db fixed bottom-0 z-5"
        />
      </div>
    )
  }
}

And then in our FeaturedMix component, we want to add an extra div in too wrap around our content and PlayButton:

import React, {Component} from 'react';

const FeaturedMix = props => (
  <div className="w-50-l vh-100 flex items-center justify-center cover bg-center bg-featured pad-bottom fixed-l left-0">
    <div className="w-100 tc pa3">
      <p className="b biryani f6 white ttu">Featured mix</p>
      <h1 class="mix-title mt0 mb2 anton white ttu">
        Mint Condition w/ Hotthobo - 27th November 2017
      </h1>
      {/* PlayButton */}
    </div>
  </div>
);

export default FeaturedMix;

And finally for our Header want want to add some styles and extra a tags to wrap around our links:

import React, {Component} from 'react'

const Header = props => (
  <header className="black mb5 pt5">
    <h1 className="ttu f3 tracked-mega anton tc mt0 mb3">Marmalade.fm</h1>
    <ul className="list flex justify-center pl0">
      <li className="mh2">
        <a className="nav-link link biryani-black f6 ttu gray">What’s hot</a>
      </li>
      <li className="mh2">
        <a className="nav-link link biryani-black f6 ttu gray">Archive</a>
      </li>
      <li className="mh2">
        <a className="nav-link link biryani-black f6 ttu gray">About</a>
      </li>
    </ul>
  </header>
)

export default Header

Introducing React Router

When our React apps grow a bit in complexity we’ll often want to add separate pages that live under separate URLs.

React only deals with one task, being the view layer, and we need to use another package to help us out with adding routes and pages. For that we can use the excellent React Router.

Let’s go ahead and install React Router via the terminal:

yarn add react-router-dom

Routing to components

Once we’ve got that installed we can set up a few pages based on their example:

// we import the parts of react-router we need as show in the basic example
import {BrowserRouter as Router, Route, Link} from 'react-router-dom'

// create components for our 3 pages, let’s just do them as h1s for now
const Home = () => <h1>Home</h1>
const Archive = () => <h1>Archive</h1>
const About = () => <h1>About</h1>

class App extends Component {
  render() {
    return (
      // router wraps our whole page and lets us use react-router
      <Router>
        <div>
          {/* this div contians our page (excluding audio player) */}
          <div className="flex-l justify-end">
            {/* FeaturedMix (needs styling and updating) */}
            <FeaturedMix />
            <div className="w-50-l relative z-1">
              {/* Header (needs styling and updating)  */}
              <Header />
              {/* Routed page */}
              <Route exact path="/" component={Home} />
              <Route path="/archive" component={Archive} />
              <Route path="/about" component={About} />
            </div>
          </div>
          {/* AudioPlayer */}
          <iframe
            width="100%"
            height="60"
            src="https://www.mixcloud.com/widget/iframe/?hide_cover=1&mini=1&feed=%2FNTSRadio%2Ffloating-points-jamie-xx-18th-august-2016%2F"
            frameBorder="0"
            className="db fixed bottom-0 z-5"
          />
        </div>
      </Router>
    )
  }
}

Using the Route component we can now make our app show certain components when our URL contains a particular path:

// when we’re on our homepage
<Route exact path="/" component={Home} />
// when the url has /archive
<Route path="/archive" component={Archive} />
// when the url has /about
<Route path="/about" component={About} />

This style of routes is great because it uses React components and keeps things very clear and easy to understand.

Linking to pages

To link to pages using React Router we can’t use a regular a tag unfortunately. We instead need to import React Router’s Link or NavLink components which let us move between pages without the page reloading.

We’re going to use the NavLink so that it gives our links an active class name when we’re currently on that page.

// import the component
import { NavLink } from 'react-router-dom'
// use the component like this:
<NavLink to="/about">About</NavLink>

Throwing that together inside our header, we can now say:

const Header = props => (
  <header className="black mb5 pt5">
    <h1 className="ttu f3 tracked-mega anton tc mt0 mb3">Marmalade.fm</h1>
    <ul className="list flex justify-center pl0">
      <li className="mh2">
        {/* we use NavLink to give us active styles when we’re on the current page */}
        {/* using the exact prop makes sure it matches exactly */}
        <NavLink exact to="/" className="nav-link link biryani-black f6 ttu gray">
          What’s hot
        </NavLink>
      </li>
      <li className="mh2">
        <NavLink to="/archive" className="nav-link link biryani-black f6 ttu gray">
          Archive
        </NavLink>
      </li>
      <li className="mh2">
        <NavLink to="/about" className="nav-link link biryani-black f6 ttu gray">
          About
        </NavLink>
      </li>
    </ul>
  </header>
)

See on our first NavLink where we’re linking to /? There we need to add an exact prop to make sure an active class only gets added when we’re on that exact page.

Adding the Mixcloud widget

For our app we’re going to be using the Mixcloud Javascript widget library to control our audio player and listen in to some of the events that occur with it.

First off, we need to add the libary to our index.html, which lives inside the public folder:

<script src="//widget.mixcloud.com/media/js/widgetApi.js"></script>

Now we can make use of the widget library inside of our App.js component. The aim is to set up some methods/actions that interact with it, doing things like playing a new mix and pause/playing the music.

We first have to initalize things by passing our audio iframe into the library. To do that we need a ref on our iframe so we can access the actual html element. Let’s call it this.player:

// add a ref to the iframe so we can grab it
return (
  <iframe
    className="player db fixed bottom-0"
    ref={player => (this.player = player)}
    width="100%"
    height="60"
    src="https://www.mixcloud.com/widget/iframe/?hide_cover=1&mini=1&feed=%2FNTSRadio%2Ffloating-points-jamie-xx-18th-august-2016%2F"
    frameBorder="0"
  />
)

With that in place let’s set up a method in our App component called mountAudio. It’s going to be an async function that takes our iframe and lets us do things with it like play new mixes or play/pause the audio:

mountAudio = async () => {
  // when we use the this keyword, our widget is
  // now accessible anywhere inside the component
  this.widget = Mixcloud.PlayerWidget(this.player)
  // here we wait for our widget to be ready before continuing
  await this.widget.ready
}

Our page will now throw an error about Mixcloud not being defined. This is because we’re not using it as a module and it’s coming outside of React in our index.html file. To get around this we need to add this rule at the top of our App.js file to tell it to stop complaining:

/*global Mixcloud*/

With our mountAudio method, we can run it when our component is ready on the page by using one of React’s lifecycle methods. We’ll use componentDidMount to run things when the component’s mounted and ready on the page.

componentDidMount() {
  // when our app component is fully loaded onto the page
  // our componentDidMount gets called and we can be sure
  // everything is ready, so we then run our mountAudio()
  // method
  this.mountAudio();
}

Playing and pausing audio

We can get our mountAudio to start playing our audio when the page loads by saying:

mountAudio = async () => {
  this.widget = Mixcloud.PlayerWidget(this.player)
  await this.widget.ready
  this.widget.play()
}

If we want to make our audio play when clicking a button, we could add a new method that controls that:

playMix = () => {
  this.widget.play()
}

And then add a button that runs the playMix method when we click it:

return <button onClick={() => this.playMix()}>Play mix</button>

We can then add another button that controls play/pause toggling with another method:

togglePlay = () => {
  // we want to togglePlay() on our widget
  this.widget.togglePlay()
}
return <button onClick={() => this.togglePlay()}>Play/Pause</button>

Playing specific mixes

If we adjust our playMix method, we can pass in a mixName to it. These can be found on Mixcloud by grabbing the end part of the URL:

www.mixcloud.com/NTSRadio/beach-bum-radio-w-zuri-friends-5th-december-2017/

We’ll also want to update our method to use load() instead of play().

playMix = mixName => {
  // the true tells it to start playing
  this.widget.load(mixName, true)
}

We can then play it using our button like this:

return (
  <button
    onClick={() => this.playMix('/NTSRadio/beach-bum-radio-w-zuri-friends-5th-december-2017/')}
  >
    Play mix
  </button>
)

The idea of what we’re going to do later is that we’ll pass in our mixNames to each of our Mix components, and when we click them, run the playMix function with that mixName.

Adding state for our audio

With our audio, we also want to keep track of what’s happening in our React state. That way we can show pause buttons when the audio is paused, and keep track of what the current mix is.

Inside our App component let’s add in some state for that:

constructor(props) {
  super(props);
  this.state = {
    // whether a mix is currently playing
    playing: false,
    // the id of the current mix
    currentMix: ''
  };
}

What we can do now is to keep track of our currentMix every time we play a new one:

playMix = mixName => {
  // set our currently playing mix in the state
  this.setState({
    currentMix: mixName,
  })
  // the true tells it to start playing
  this.widget.load(mixName, true)
}

How can we keep track of whether we’re currently paused or playing music? The Mixcloud library has some events built in that can help us with that!

mountAudio = async () => {
  this.widget = Mixcloud.PlayerWidget(this.player)
  await this.widget.ready

  // using the mixcloud widget events we can detect when our
  // audio has been paused, set playing state to false
  this.widget.events.pause.on(() =>
    this.setState({
      playing: false,
    })
  )
  // audio is playing again, set playing state to true
  this.widget.events.play.on(() =>
    this.setState({
      playing: true,
    })
  )
}

With that we can then do cool things like telling the user whether they can pause or play the music:

return <button>{this.state.playing ? 'Pause' : 'Play'}</button>

Creating the mix component

We’ll start off by moving our Home page into a Home.js file, so that we stick with our approach of one component per file. This makes things easier to find and work on, and also stops our files growing too big!

import React from 'react'

const Home = props => (
  <div className="flex flex-wrap justify-between mixes ph3 ph4-l">
    <div className="mix mb4">{/* a mix */}</div>
    <div className="mix mb4">{/* another mix */}</div>
  </div>
)

export default Home

Also don’t forget to import it into our App.js again:

import Home from './Home'

With that in place we can now create a new Mix component. This will house each of our mixes on the homepage, which is essentially a 3x4 box with the mix title and a play button, which when we click starts playing that particular mix.

import React from 'react'

const Mix = props => (
  <div className="aspect-ratio aspect-ratio--3x4 pointer bg-black">
    <div className="ph3 pv4 aspect-ratio--object mix-overlay">
      <div className="flex items-center relative z-2">
        <h1 className="f4 f3-l mv0 white ttu biryani pr2 lh-title">{props.name}</h1>
        {/* PlayButton goes here */}
      </div>
    </div>
  </div>
)

export default Mix

Now we can use those Mix componens inside of our Home page:

import React from 'react'
import Mix from './Mix'

const Home = props => (
  <div className="flex flex-wrap justify-between mixes ph3 ph4-l">
    <div className="mix mb4">
      <Mix name="This Is The Blues" id="/adamkvasnica3/this-is-the-blues/" />
    </div>
    <div className="mix mb4">
      <Mix
        name="Ambient treasures"
        id="/salvatore-muscat/ambient-treasures-vol1-towards-the-dream/"
      />
    </div>
  </div>
)

export default Home

Play button component

For our PlayButton we can add that into a new PlayButton.js file:

import React from 'react'

const PlayButton = () => (
  <div>
    <button className="button bg-transparent contain button-reset play-button db bg-center pointer center" />
  </div>
)

export default PlayButton

We can then update our Mix to use it:

import React from 'react'
import PlayButton from './PlayButton'

const Mix = props => (
  <div className="aspect-ratio aspect-ratio--3x4 pointer bg-black">
    <div className="ph3 pv4 aspect-ratio--object mix-overlay">
      <div className="flex items-center relative z-2">
        <h1 className="f4 f3-l mv0 white ttu biryani pr2 lh-title">{props.name}</h1>
        <PlayButton />
      </div>
    </div>
  </div>
)

export default Mix

Play mix component

The way that we’re going to control playing mixes is by creating a component that performs that functionality for us. A bit like a wrapper that when clicked will start playing a mix.

It won’t have any styling beyond a pointer cursor and will render out the content. We’ll be passing our playMix, currentMix and playing props to it to help it do its thing.

import React from 'react'

// this component wraps around anything that when we click
// will start playing a mix for us. it provides us
// functionality rather than any design
const PlayMix = ({playMix, id, currentMix, playing, children}) => (
  // when our currently playing mix equals the id of the mix
  // that this component refers to, we will add a class name
  // of 'playing'
  <div className="pointer" onClick={() => playMix(id)}>
    {/* children refers to whatever content we put inside 
    of our component */}
    {children}
  </div>
)

export default PlayMix

Passing our state and actions

With React components, they only know about the props they are provided with, so we need to make to manually pass down our state and actions from the App component.

class App extends Component {
  constructor(props) {
    super(props)
    this.state = {
      playing: false,
      currentMix: '',
    }
  }
  // group together our actions to it makes them easier to
  // pass down
  actions = {
    togglePlay: () => {
      this.widget.togglePlay()
    },
    playMix: mixName => {
      this.setState({
        currentMix: mixName,
      })
      this.widget.load(mixName, true)
    },
  }
  render() {
    return (
      <Router>
        {/* all our other components */}
        {/* here we render our component using a function so we can pass all
        of our state and actions to it. we use the spread so we don’t have to
        manually write out each one */}
        <Route exact path="/" component={() => <Home {...this.state} {...this.actions} />} />
      </Router>
    )
  }
}

Here we group together our actions and pass them down along with our state onto the Home component. To do this we need to write our component as a function that gets returned to us.

When we pass in things to components they will be converted to props, regardless of whether they are state.

Inside of our Mix component we need to take these props and pass them on through again. It’s made a lot easier with the spread again:

const Home = props => (
  <div className="flex flex-wrap justify-between mixes ph3 ph4-l">
    <div className="mix mb4">
      {/* here we just pass the props straight through */}
      <Mix name="This Is The Blues" id="/adamkvasnica3/this-is-the-blues/" {...props} />
    </div>

    <div className="mix mb4">
      {/* here we just pass the props straight through */}
      <Mix
        name="Ambient treasures"
        id="/salvatore-muscat/ambient-treasures-vol1-towards-the-dream/"
        {...props}
      />
    </div>
  </div>
)

We then want to do the same again inside of our Mix component:

// by doing ...props we grab all the remaining props
const Mix = ({name, ...props}) => (
  <div className="aspect-ratio aspect-ratio--3x4 pointer bg-black">
    <PlayMix {...props}>
      <div className="ph3 pv4 aspect-ratio--object mix-overlay">
        <div className="flex items-center relative z-2">
          <h1 className="f4 f3-l mv0 white ttu biryani pr2 lh-title">{name}</h1>
          <PlayButton />
        </div>
      </div>
    </PlayMix>
  </div>
)

Adding component to mix

To make our component smarter we are going to make it play our mixes based on the data provided. The way we can do this is by passing in an id to our mixes.

// here we pick out our name prop, and then the rest of the props
// we pass on through
const Mix = ({name, pictures, slug, id, ...props}) => (
  <div
    className="aspect-ratio aspect-ratio--3x4 pointer bg-black cover bg-center"
    style={{backgroundImage: `url(${pictures.extra_large})`}}
  >
    <div className="ph3 pv4 aspect-ratio--object mix-overlay">
      <div className="flex flex-column relative z-2">
        <h1 className="f4 f3-l mv0 white ttu biryani pr2 lh-title">{name}</h1>
      <PlayMix id={id}
    >
        <PlayButton />
      {/* PlayButton goes here */}
      </div>
    </div>
  </div>
);

Then in our home component we can also pass our name property to our mix

      <div className="mix mb4">
        {/* here we just pass the props straight through */}
        {/* here we pass through an id for the mix to play with */}
        <Mix  name="mixname"
        id="url for mix"
        {...props} {...mix} />
      </div> 

To make our code easier to red we are going to make a new component called playMix. We can do this by creating a new file PlayMix.js and adding the following code.

    // this component wraps around anything that when we click
    // will start playing a mix for us. it provides us functioanlity
    // rather than any design
    
    const PlayMix = ({playMix,children,id}) => (
    <div className="pointer" onClick{() => playMix(id)}>
    {children}
    </div>
);

Displaying play/pause button

We want add some functionality to our component, so when we play a mix we show a pause button and when we click on another mix it pauses the current mix we are playing. We can achieve this result by using a mix of state and css.

In our css styling our play button will have a background image that will be equal to our pause button.

.playing .play-button{
background-image: url('../images/play.svg');
}

Then in our PlayMix component we want to write a statement that checks if our current mix is equal to the mix id. If this statement is correct we will add a class name of .playing

const PlayMix = ({playMix, id, currentMix,children}) => (
 
   // when our currently playing mix equals the id of the mix
  // that this component refers to, we will add a class name
  // of 'playing'

  <div className={`pointer ${id === currentMix && 'playing'}` onClick={() => playMix(id)}>
    {children}
  </div>
);

Pausing currently playing mixes

Currently when we have a mix playing and we hit the pause button, our mix currently reverts back to the start but what we want to do is the mix itself to pause.

In our app component we want to add some functionality in our actions section.

playMix: mixName =>{
    //if mixName is the same as the currently
    //playing mix, we want to pause it instead
    const {currentMix} = this.state
    if (mixName === currentMix){
      return  this.widget.togglePlay()
    }

    //update the currentMix by its name and then
    // start playing it immediately
    this.setState({
        currentMix: mixName
    });
    // load a new mix by its name and then
    // start by playing it immediately
    this.widget.load(mixName, true);
}
};

Getting data from Mixcloud

We can data about mixes using the mix cloud api

We can do a fetch to grab the information from the api and bring it into our app. We can then turn the response that we recieve into json to use in our app.

class App extends Component {
  fetchMixes = async () => {
    const {addMix} = this.props;

    // here we loop over our mix ids and fetch each other
    mixesData.map(async id => {
      try {
        // always remember await when using fetch in an async function
        const response = await fetch(
          // we add the id onto the end of our url as a dynamic segment
          `https://api.mixcloud.com${id}`
        );
        const data = await response.json();

        addMix(data);
      } catch (error) {
        console.log(error);
      }
    });
  };

  componentDidMount() {
    this.fetchMixes();
  }

We can access the properties of the json we recieve from our fetch such background images with the code below.

// here we pick out our name prop, and then the rest of the props
// we pass on through
const Mix = ({name, pictures, slug, id, ...props}) => (
  <div
    className="aspect-ratio aspect-ratio--3x4 pointer bg-black cover bg-center"
    style={{backgroundImage: `url(${pictures.extra_large})`}}
  >
    <div className="ph3 pv4 aspect-ratio--object mix-overlay">
      <div className="flex flex-column relative z-2">
        <h1 className="f4 f3-l mv0 white ttu biryani pr2 lh-title">{name}</h1>
      </div>
      <Link to={`/show/${slug}`} className="absolute absolute--fill z-3" />
      <PlayMix id={id} className="absolute bottom-1 left-1 z-5 flex items-left pointer">
        <PlayButton />
      </PlayMix>
    </div>
  </div>
);

export default Mix;

Multiple fetches

Marmalade.fm data

We want to have multiple mixes on our page and to do that we can bring in data.

const mixes = [
  '/maxvibes/ninja-tune-jazz-session-part-1/',
  '/NTSRadio/mint-condition-w-hotthobo-27th-november-2017/',
  '/NTSRadio/full-house-6th-november-2017/',
  '/NTSRadio/questing-w-zakia-12th-november-2017/',
  '/NTSRadio/foreign-hour-family-edition-4th-october-2017/',
  '/truthoughts/tru-thoughts-15th-anniversary-lefto-mix/',
  '/adamkvasnica3/trip-hop-for-jazz-junkies/',
  '/NTSRadio/floating-points-four-tet-caribou-23rd-march-2015/',
  '/NTSRadio/bonobo-24th-june-2015/',
  '/NTSRadio/floating-points-12th-june-2017/',
  '/NTSRadio/mount-kimbie-james-blake-8th-september-2015/'
];

export default mixes;

We need to import this data into our app.

// we import our mix data
import mixesData from '../data/mixes';

We essentially want to loop through the array of data we have and grab the ids.

class App extends Component {
  fetchMixes = async () => {
    const {addMix} = this.props;

    // here we loop over our mix ids and fetch each other
    mixesData.map(async id => {
      try {
        // always remember await when using fetch in an async function
        const response = await fetch(
          // we add the id onto the end of our url as a dynamic segment
          `https://api.mixcloud.com${id}`
        );
        const data = await response.json();

        addMix(data);
      } catch (error) {
        console.log(error);
      }
    });
  };

Multiple fetches

What we want to do is create multiple mix components for our app. We can do this by running the map function over our data to create the components.

const Home = ({mixes, ...props}) => (
  <div className="flex flex-wrap justify-between mixes ph3 ph4-l mb5">
    {/* here we loop through all of our mixes */}
    {/* we slice the array by starting at 0 and taking the first 6 */}
    {mixes.map(mix => (
      <div className="mix mb4">
        {/* here we just pass the props straight through */}
        {/* here we pass through an id for the mix to play with */}
        <Mix {...props} {...mix}  id={mix.key}/>
      </div>
    ))}
  </div>
);

Building an archive view

In order to create our archive page we need to create an archive component.

import React from 'react';
const Archive = props => (
    <div>
    Archive
    </div>
)
export default Archive

Then in order to view our archive page we need to import it into our app.js

import Archive from './Archive';

When we want to pass in some properties to our page in our route we use render.

<Route path="/Archive" render={() => <Archive {...this.state} {...this.action} />} />

In our final version of our Archive page, we want to create a list of mixes using the `<ul> <li> tags. We also want to bring in our playmix component to add functionality.

const Archive = ({mixes, ...props}) => (
  <ul className="list pl0 archive mv0 pad-bottom">
    {mixes.map(mix => (
      <li className="ph3 ph4-l">
        <PlayMix id={mix.id}>
          <div className="pv3 bb b--light-gray flex justify-between items-center">
            <h1 className="f6 mv0 black ttu biryani pr2">{mix.name}</h1>
            <PlayButton />
          </div>
        </PlayMix>
      </li>
    ))}
  </ul>
);

export default Archive;

Feature the first six mixes

On our home page we only want to render the first six mixes in our array. We can do this by using a javascript function called slice.

Slice, the slice method returns the selected elements in an array in a new array object.

const Home = ({mixes, ...props}) => (
  <div className="flex flex-wrap justify-between mixes ph3 ph4-l mb5">
    {/* here we loop through all of our mixes */}
    {/* we slice the array by starting at 0 and taking the first 6 */}
    {mixes.slice(0,6).map(mix => (
      <div className="mix mb4">
        {/* here we just pass the props straight through */}
        {/* here we pass through an id for the mix to play with */}
        <Mix {...props} {...mix}  id={mix.key}/>
      </div>
    ))}
  </div>
);

Adding about page

Just like our Archive page we need to create a seperate component for our About page.

We first import react to our component.

import React from 'react';

consr About = props => (
    <div> About </div>
)
export default About

Then in order to view our About page we need to import it into our app.js

import Archive from './Archive';

Then we can add some styling to our about page

const About = ({mixes}) => (
  <div className="ph3 ph4-l pad-bottom">
    <div className="measure center lh-copy">
      <p className="mt0">
        Marmalade.fm features the latest and greatest in grooves, beats and world music.
      </p>
      <p className="mb4">
        Whether you’re into hip hop, trip hop, classic jazz, fusion jazz, afro beat or break beat…
        we have you covered!
      </p>
    </div>
    </div>

Adding statistics

In our about page we want to add some statistics, about the mixs we currently have. We can do this by creating a component that will display this for us in our about.js.

const Stat = ({}) => <div className='w-third tc pa3 ba bw2 b-light-gray'>Stat goes here</div>

In order to make our stat dynamic we need to pass it some properties.

const Stat = ({statName,statNumber,statWord}) => <div className='w-third tc pa3 ba bw2 b-light-gray'>Stat goes here</div>
<div className="flex pt3">
<stat statName="Featuring" statNumber={11} statWord="mixes">
<stat statName="Played.." statNumber={114,999} statWord="times">
<stat statName="With..." statNumber={64578} statWord="seconds">
</div>

Using reduce

In this section we are going to calculate our mix stats using the javascript function reduce.

When we have an array of numbers and we want to find the total of the numbers we can use reduce. It adds the numbers in the array together by always keeping the value of the array items stored in the function.

To use the mixes information we need to make sure that in our `app.js we pass our props.

<Route path="/Archive" render={() => <Archive {...this.state} />} />

Now to find the information we need for our stats we can do the following

<div className="flex pt3">

//We want to find the length of the array of //mixes we have
<stat statName="Featuring" statNumber={mixes.length} statWord="mixes">

//we want to use the play_count property
<stat statName="Played.." statNumber={mixes.reduce((accum,current) => accum + curren.play_count, 0)} statWord="times">

//we want to use the audio_length property
<stat statName="With..." statNumber={mixes.reduce((accum,current) => accum + curren.audio_length, 0)} statWord="seconds">
</div>